

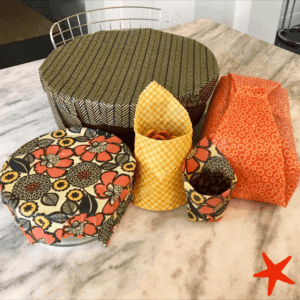
 A cool new plastic replacement item has hit the market: Wax Wraps. Wax Wraps are a great replacement for plastic wrap (a.k.a. saran wrap, cling wrap, etc). These sustainable products can be made from cotton cloth with either bee’s wax, vegan plant-based candelilla wax, or non-GMO Soy wax. The best part? They can be used over and over. You can find them on-line all over the place. But if you are feeling particularly crafty you can also make them at home.
My sister and Plaine Products co-founder, Alison Webster, undertook this craft at home with her family and had great success. Even better, she gave me some to enjoy. We’ve got the recipe they used and the steps they took.
If you’ve made wax wraps in the past and they aren’t working as well as they used to they might just need a little refresher. Heat the over back up to 200 and lay them flat. Once the wax softens you can use a brush to spread it back out evenly or add more wax as needed.
Recipe for Wax Wraps:
What you need:
- Yellow Beeswax pellets, vegan plant-based candelilla wax, or non-GMO Soy wax (available online)
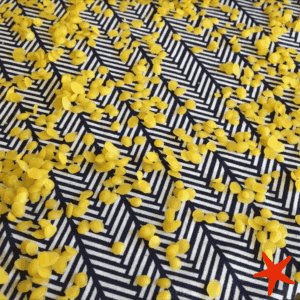
- Thin, tight weave cotton material
- Cardboard
- Scissors or Pinking Shears
- Oven
- Old, stiff paintbrush that can be sacrificed to the cause
To give you a sense of scale, Ali and her family used 2 lbs of beeswax pellets and 4 yards of materials to create 30 wraps of various shapes and sizes.
Instructions:
- Preheat oven to 200 degrees.
- Assemble materials. Cut fabric into various size squares (for different sized bowls & food pouches). If you have them use pinking shears to make sure fabric doesn’t unravel.
- Spread the fabric out on the cardboard. Make sure you’ve cut the cardboard so it will fit on the oven shelf.
- Sprinkle beeswax pellets over the squares of fabric.

- Put in oven on cardboard for 3 – 5 minutes, but keep an eye on it. You just want the beeswax to melt.
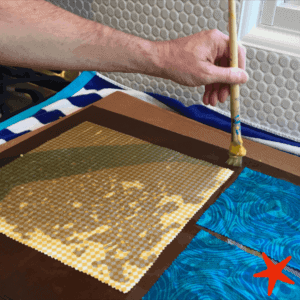
- Take the cardboard out of the over and place on the counter. Use a paintbrush to spread the wax out over the fabric. Make sure it goes all the way to the edges and covers the fabric evenly.

- You can hang them on a line to dry. Put them on cooling racks. Or leave them on the cardboard.
That’s it! Once they are cool you can use them to cover bowls, wrap up bread, a half-used lime, or fold them into snack containers. The beeswax is antimicrobial in nature, so it’s great for left-overs. You can also freeze them with food inside for up to 3 months. The only limit is your imagination!
In between uses you can wash the wax wraps in cold water. If they start to wear out heat the wraps back up and spread out the wax or add more beeswax to refresh them! Let us know if you try out the craft, we’d love to see pictures. Tag us on social media: Twitter, Facebook, Instagram & Pinterest so we can share. If you have a craft that helps you use less plastic we’d love to hear about it! Please reach out!